How to Take Better Screenshots of Your Indie Game
TL;DR: Think like a photographer, not a developer. Build a debug free camera in your engine, compose shots using rule of thirds and leading lines, and capture during golden hour lighting. Aim for 9-12 screenshots: core gameplay first, then variety. Fill the frame, show action, and provoke curiosity about what comes next.
Key Takeaways
- Your first screenshot appears in Discovery Queue, search results, and recommendation widgets, making it possibly your most important static marketing asset
- Set up a free camera (Unity Cinemachine, Unreal spectator pawn, or custom script) to capture from angles gameplay doesn't allow
- Three composition rules cover 90%: rule of thirds (subject at grid intersections), leading lines (environmental geometry pointing to action), fill the frame (no dead space)
- Capture during golden hour in-game time for flattering light and interesting shadows
- Include UI in most screenshots (helps genre fans understand systems) but provide UI-free versions in your press kit
Screenshots are the most underestimated marketing asset in indie game development. You spent two years building a gorgeous game, then grabbed five random frames during a playtest and called it done. Your store page deserves better. Your game deserves better. And the algorithm that decides whether to surface your game to potential players? It cares about screenshots more than your feelings.
As we covered in our complete guide to game trailers and screenshots, your first screenshot shows up in Steam search results, the Discovery Queue, recommendation widgets, and every algorithmic surface Valve can stuff it into. It sells your game while you sleep. Getting it right once pays dividends across every marketing channel, from your Steam store page to your press kit to every social post you'll ever make.
This guide is about the craft of taking better screenshots. Not the specs (we'll cover those too), but the actual process of capturing images that make people stop scrolling and start wishlisting.
Think Like a Photographer, Not a Developer
The biggest screenshot mistake developers make is capturing the game from the perspective of someone who built it. You screenshot the crafting system because you're proud of it. You capture the inventory because it took three months to code. You grab a shot of the tutorial area because that's where the game starts.
Players don't care about any of that. Not yet, anyway.
Good screenshots work like good photography. They tell a story in a single frame. What developers who've analyzed their Steam page analytics consistently find is that screenshot quality correlates more strongly with wishlist conversion than almost any other store page element. They make the viewer feel something, or better yet, make them curious about something. Every screenshot should provoke at least one question: "How did that happen?" or "What's in that building?" or "Why is that creature on fire?"
This is a mindset shift. You're not documenting your game. You're selling it.
Setting Up a Free Camera
Most game engines give you the tools to capture great screenshots. You just have to build the rig.
Unity
Unity's Cinemachine package is your best friend here. Add a virtual camera, set it to freelook mode, and bind it to debug keys that don't ship with your build. You want full control over position, rotation, and field of view without being constrained by your normal gameplay camera.
For quick captures, the Recorder package (Window > General > Recorder) lets you grab frames at arbitrary resolutions. Developers who've set up dedicated capture rigs report that the initial hour of setup pays off across dozens of marketing assets. Set it to output 3840x2160 for 4K press kit shots, even if your game normally runs at 1080p. The camera doesn't know the difference.
A simpler approach: pause your game, detach your camera from the player controller, and fly it around with WASD. Add a time scale slider so you can freeze the action at the exact right moment. This takes maybe an hour to implement and pays for itself immediately.
Unreal Engine
Unreal ships with a spectator pawn you can possess in PIE (Play in Editor) mode. Hit F8 to eject from your player character and fly the camera freely. This works out of the box with zero additional code.
For more control, the Movie Render Queue lets you capture frames with anti-aliasing cranked to absurd levels, path tracing enabled, and resolution scaling way beyond your monitor's native output. The results look better than anything a player will actually see during gameplay, which is fine for press kit screenshots. Just don't use these as your Steam screenshots if they misrepresent the real experience.
Unreal also has a built-in High Resolution Screenshot tool (press the tilde key, type "HighResShot 2" for 2x resolution). Fast, simple, and often overlooked.
Godot
Godot doesn't ship with a photo mode, but building one is straightforward. Create a Camera2D or Camera3D node that's independent of your gameplay camera, give it a script with WASD movement and mouse look, and toggle between cameras with a debug key. The get_viewport().get_texture().get_image() method captures the current frame at whatever resolution you're rendering.
For 2D games, you can also adjust the viewport stretch settings to render at higher resolutions temporarily during capture sessions.
The Photo Mode Approach
Some developers build a full photo mode into their game (think Ghost of Tsushima or Hades). For an indie, you don't need the full feature set. A simple debug camera with controls for time pause, field of view, and a toggle for the UI is enough. If you're feeling ambitious, add depth of field controls and a basic color temperature slider.
This debug photo mode doesn't need to ship. It's a developer tool. But the screenshots it produces will look like they came from a game that has a photo mode, and that perceived polish matters.
Composition Rules That Actually Matter
You don't need to memorize every photography principle. Three rules will cover 90% of your screenshot needs.
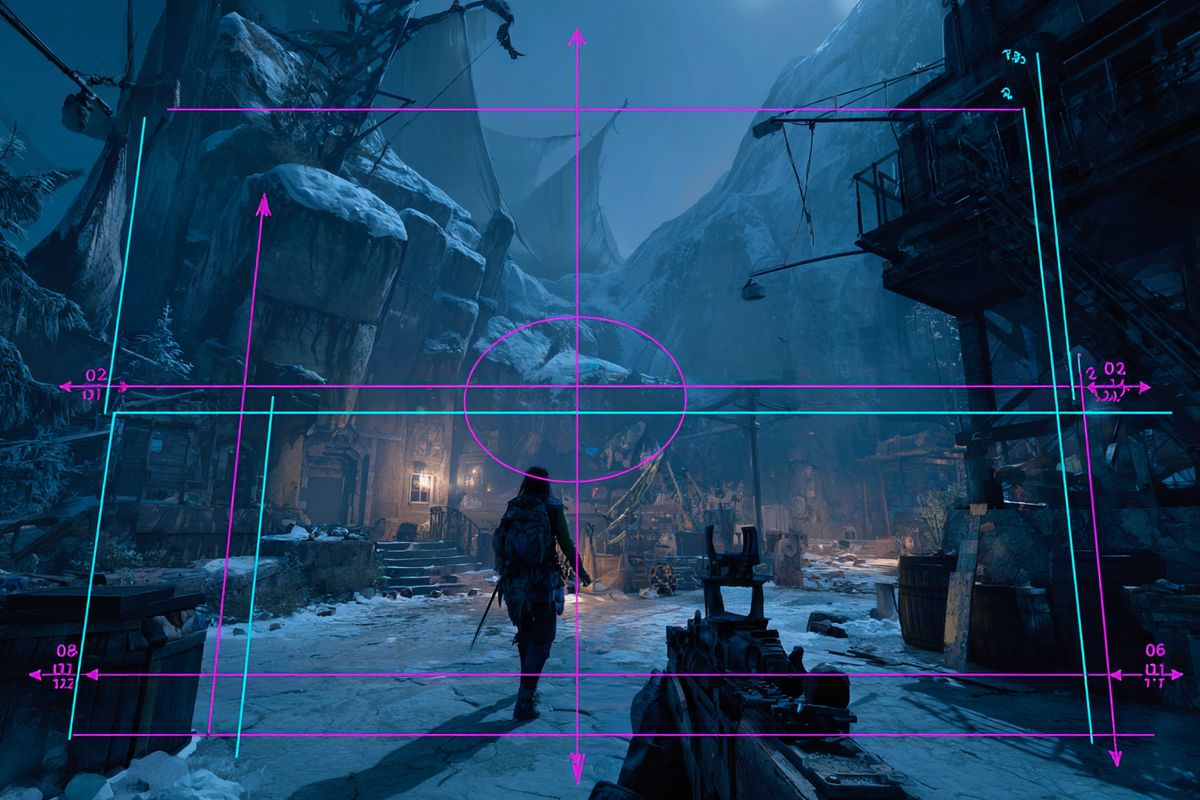
Rule of Thirds
Imagine your screen divided into a 3x3 grid. Place your subject (the player character, the important object, the focal point) at one of the four intersections where the grid lines cross. Not dead center. The intersections.
This works because human eyes naturally scan images along these lines. A character placed at the left-third intersection with the environment filling the right two-thirds creates depth and context simultaneously. A character dead center feels like a passport photo.
Most engines let you overlay a rule-of-thirds grid in the viewport. Turn it on during screenshot sessions.
Leading Lines
Any visual element that guides the eye toward your subject counts as a leading line. A road, a river, a row of torches, the trajectory of a spell effect. These lines pull the viewer's gaze through the image and toward whatever you want them to notice.
In practice, this means positioning your camera so that environmental geometry points toward the action. A corridor that narrows toward a boss. A path that curves toward a distant castle. Particle trails that arc toward an explosion. You're directing attention the same way a film cinematographer does, just in a single frame.
Fill the Frame
Empty space is your enemy. If 40% of your screenshot is featureless sky or flat ground, you're wasting pixels that could be selling your game. Get the camera closer. Drop the field of view to tighten the shot. Find an angle where the frame is dense with visual information.
This doesn't mean cluttered. It means purposeful. Every part of the frame should contribute something, whether that's environmental storytelling, mechanical clarity, or pure visual appeal.
The classic beginner mistake is the wide establishing shot where the player character is approximately six pixels tall. Nobody can tell what your game is from that distance. Save the wide shots for your second or third screenshot. Lead with something close enough to read.
Lighting and Color: The Invisible Salespeople
Two screenshots of the same scene can look completely different based on lighting. One looks like a professional marketing asset. The other looks like a screenshot from 2004. The difference is rarely about the art itself.
Time of Day Matters
If your game has a day/night cycle, golden hour (early morning or late afternoon in game time) produces the most flattering screenshots almost universally. The long shadows add depth. The warm light adds mood. The contrast between lit and shadowed areas creates visual interest.
Midday lighting (harsh, overhead, no shadows) makes everything look flat. Nighttime can work for horror or atmospheric games, but you need strong point lights or you'll end up with a screenshot that's just different shades of dark gray.
Set your game clock to the most photogenic time before starting a capture session. If your game doesn't have time-of-day, look for areas with strong directional lighting and interesting shadow patterns.
Post-Processing: Tasteful vs. Misleading
Some post-processing in screenshots is expected and fine. Tweaking contrast, bumping saturation slightly, adjusting white balance. These are the equivalent of basic photo editing, and every major game studio does them.
What crosses the line: adding effects that don't exist in your game. If your game doesn't have bloom, don't add bloom to screenshots. If your game runs at a specific color palette, don't shift it to something trendier for marketing. Players who buy based on your screenshots and find a different-looking game will leave negative reviews faster than you can say "misleading marketing materials."
Valve's Steamworks documentation is explicit on this point: screenshots should show the actual gameplay experience. Concept art, pre-rendered stills, and doctored images are not allowed as Steam screenshots. You can present your game at its best, but that best needs to be real.
A good rule of thumb: if a player could theoretically see this exact frame during normal gameplay (even if the specific moment is rare), it's a fair screenshot. If they couldn't, it's not.
The 9-to-12 Screenshot Sweet Spot
Martin Robinson, former editor-in-chief at Eurogamer, described the ideal press kit as containing "nine to 12 screenshots." That number isn't arbitrary. It's the sweet spot between showing enough variety to communicate your game's scope and not overwhelming journalists with a folder of fifty images they'll never sort through.
For Steam specifically, Valve requires a minimum of five screenshots but recommends more. Six to eight is the typical range on store pages. For your press kit, aim higher, around nine to twelve, because press needs more options than your store page.
Here's a framework for choosing which shots to capture:
Must-have shots (capture these first):
- Core gameplay loop at its most visually striking
- A second environment or biome (proves the game has variety)
- A unique mechanic or system that differentiates your game
- A dramatic moment (boss fight, story beat, set piece)
Strong additions (capture these next): 5. UI/inventory/skill tree (shows depth, onboards genre fans) 6. A third environment 7. A character or NPC interaction 8. A scale shot showing the breadth of your world
Press kit extras (for the 9-12 range): 9. UI-free version of your best shots (journalists need these) 10. An early-game moment and a late-game moment side by side 11. Any multiplayer or co-op content 12. Your most photogenic scene, regardless of game progression
This maps directly to what your capsule art needs to communicate, so planning both at the same time saves effort.